Using the Infinispan Client
This guide demonstrates how your Quarkus application can connect to an Infinispan server using the Infinispan Client extension.
先决条件
完成这个指南,你需要:
-
大概15分钟
-
编辑器
-
JDK 17+ installed with
JAVA_HOMEconfigured appropriately -
Apache Maven 3.9.16
-
如果你愿意的话,还可以选择使用Quarkus CLI
-
如果你想构建原生可执行程序,可以选择安装Mandrel或者GraalVM,并正确配置(或者使用Docker在容器中进行构建)
-
A working Docker environment
架构
In this guide, we are going to expose a Greeting Rest API to create and display greeting messages by using
the Infinispan RemoteCache API
and getAsync and putAsync operations.
We’ll be using the Quarkus Infinispan Client extension to connect to interact with Infinispan.
解决方案
我们建议您按照下一节的说明逐步创建应用程序。然而,您可以直接转到已完成的示例。
克隆 Git 仓库: git clone https://github.com/quarkusio/quarkus-quickstarts.git ,或下载一个 存档 。
The solution is located in the infinispan-client-quickstart directory.
创建Maven项目
首先,我们需要一个新的项目。使用以下命令创建一个新项目:
For Windows users:
-
If using cmd, (don’t use backward slash
\and put everything on the same line) -
If using Powershell, wrap
-Dparameters in double quotes e.g."-DprojectArtifactId=infinispan-client-quickstart"
This command generates a new project, importing the Infinispan Client extension.
If you already have your Quarkus project configured, you can add the infinispan-client extension
to your project by running the following command in your project base directory:
quarkus extension add infinispan-client./mvnw quarkus:add-extension -Dextensions='infinispan-client'./gradlew addExtension --extensions='infinispan-client'这会将以下内容添加到你的构建文件中:
<dependency>
    <groupId>io.quarkus</groupId>
    <artifactId>quarkus-infinispan-client</artifactId>
</dependency>implementation("io.quarkus:quarkus-infinispan-client")
annotationProcessor 'org.infinispan.protostream:protostream-processor:4.6.1.Final' (1)| 1 | Mandatory in the Gradle build to enable the generation of the files in the annotation based serialization |
Creating the Greeting POJO
We are going to model our increments using the Greeting POJO.
Create the src/main/java/org/acme/infinispan/client/Greeting.java file, with the following content:
package org.acme.infinispan.client;

import org.infinispan.protostream.annotations.Proto;

@Proto (1)
public record Greeting(String name, String message) {} (2)| 1 | You only need an annotation to tag the record to be marshalled by Protostream |
Note that we are not going to use Java serialization. Protostream is a serialization library based on Protobuf data format part of Infinispan. Using an annotation based API, we will store our data in Protobuf format.
Creating the Greeting Schema
We are going to create our serialization schema using the GreetingSchema interface.
Create the src/main/java/org/acme/infinispan/client/GreetingSchema.java file, with the following content:
package org.acme.infinispan.client;

import org.infinispan.protostream.GeneratedSchema;
import org.infinispan.protostream.annotations.ProtoSchema;

@ProtoSchema(includeClasses = Greeting.class) (1)
public interface GreetingSchema extends GeneratedSchema { (2)
}| 1 | Includes the Greeting pojo with the @ProtoSchema annotation |
| 2 | Extends GeneratedSchema Protostream API interface |
The Protobuf Schema that will be generated and used both on client and Infinispan Server side, will have the following content:
// File name: GreetingSchema.proto
// Generated from : org.acme.infinispan.client.GreetingSchema

syntax = "proto3";

message Greeting {

   optional string name = 1;

   optional string message = 2;
}|
You must include the Protostream annotations processor in your build file. Starting with Java 24, schema generation will not work unless this annotation processor is explicitly added. Maven
build.gradle
|
Creating the Infinispan Greeting Resource
Create the src/main/java/org/acme/infinispan/client/InfinispanGreetingResource.java file, with the following content:
package org.acme.infinispan.client;

import io.quarkus.infinispan.client.Remote;
import jakarta.inject.Inject;
import jakarta.ws.rs.GET;
import jakarta.ws.rs.POST;
import jakarta.ws.rs.Path;
import org.infinispan.client.hotrod.RemoteCache;

import java.util.concurrent.CompletionStage;

@Path("/greeting")
public class InfinispanGreetingResource {

    @Inject
    @Remote("mycache") (1)
    RemoteCache<String, Greeting> cache; (2)

    @POST
    @Path("/{id}")
    public CompletionStage<String> postGreeting(String id, Greeting greeting) {
        return cache.putAsync(id, greeting) (3)
              .thenApply(g -> "Greeting done!")
              .exceptionally(ex -> ex.getMessage());
    }

    @GET
    @Path("/{id}")
    public CompletionStage<Greeting> getGreeting(String id) {
        return cache.getAsync(id); (4)
    }
}| 1 | Use the @Remote annotation to use a cache. If the cache does not exist, will be created with a
default configuration on first access. |
| 2 | Inject the RemoteCache |
| 3 | Put the greeting id as a key and the Greeting pojo as a value |
| 4 | Get the greeting by id as the key |
创建测试类
Edit the pom.xml file to add the following dependency:
<dependency>
    <groupId>io.rest-assured</groupId>
    <artifactId>rest-assured</artifactId>
    <scope>test</scope>
</dependency>
Create the src/test/java/org/acme/infinispan/client/InfinispanGreetingResourceTest.java file with the following content:
package org.acme.infinispan.client;

import io.quarkus.test.junit.QuarkusTest;
import io.restassured.http.ContentType;
import org.junit.jupiter.api.Test;

import static io.restassured.RestAssured.given;
import static org.hamcrest.CoreMatchers.is;

@QuarkusTest
class InfinispanGreetingResourceTest {

    @Test
    public void testHelloEndpoint() {
        given()
              .contentType(ContentType.JSON)
              .body("{\"name\":\"Infinispan Client\",\"message\":\"Hello World, Infinispan is up!\"}")
              .when()
              .post("/greeting/quarkus")
              .then()
              .statusCode(200);

        given()
                .when().get("/greeting/quarkus")
                .then()
                .statusCode(200)
                .body(is("{\"name\":\"Infinispan Client\",\"message\":\"Hello World, Infinispan is up!\"}"));
    }
}
让其运行
We just need to run the application using:
quarkus dev./mvnw quarkus:dev./gradlew --console=plain quarkusDevWe should have the Infinispan server running thanks to the Dev Services.
We can access the Dev Services UI through http://localhost:8080/q/dev/.
The Dev UI should display the Infinispan UI Panel.
|
Click on the Web Console link and log using |
Interacting with the Greeting Service
As we have seen above, the Greeting API exposes two Rest endpoints. In this section we are going to see how to create and display a greeting message.
Creating a Greeting Message
With the following command, we will create a greeting message with the id quarkus.
curl -X POST http://localhost:8080/greeting/quarkus -H "Content-Type: application/json" -d '{"name" : "Infinispan Client", "message":"Hello World, Infinispan is up!"}'The service should respond with a Greeting added! message.
Displaying a Greeting Message
With the following command, we will display the greeting message with the id quarkus.
curl http://localhost:8080/greeting/quarkusThe service should respond with the following json content.
{
"name" : "Infinispan Client",
"message" : "Hello World, Infinispan is up!"
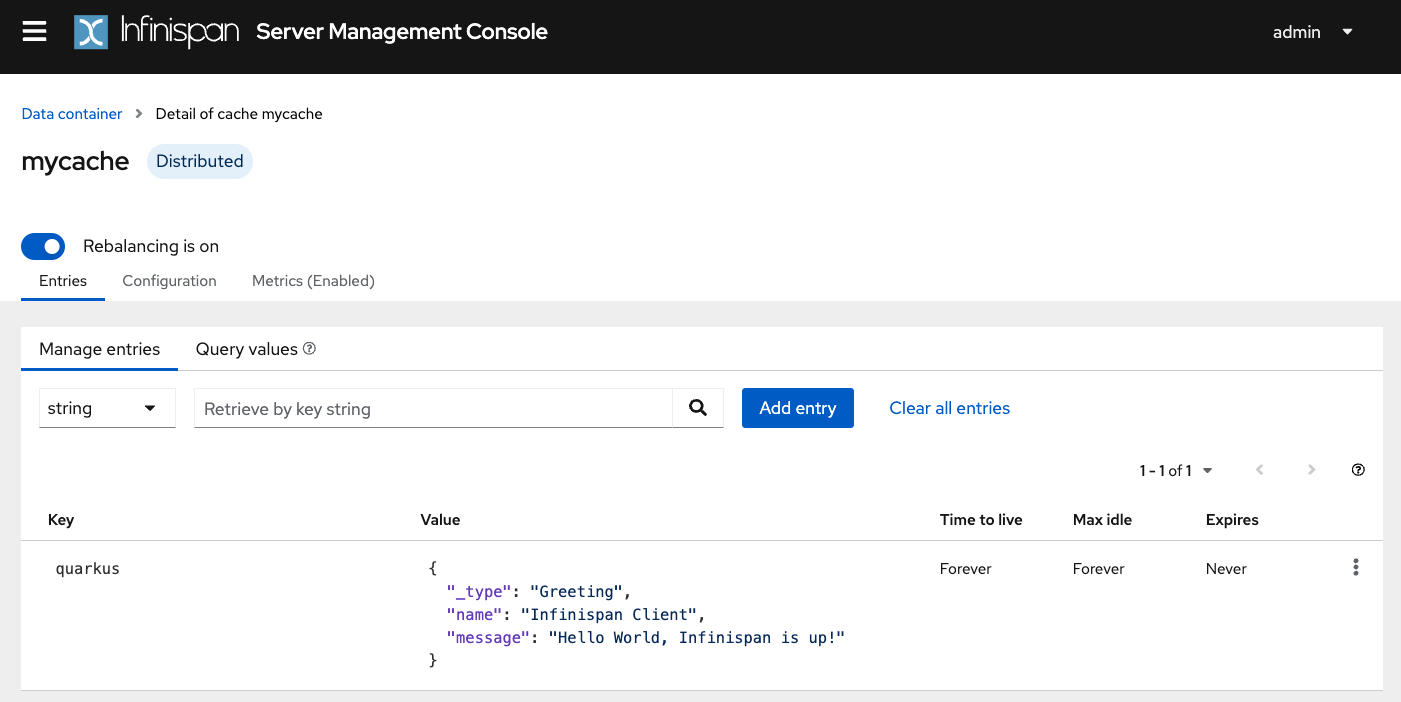
}Display the cache and content with the Infinispan Server Console
If a requested cache does not exist, Quarkus creates a cache with a Default configuration on first access. We should be able to reaload the Infinispan Server Console and display the content of the Cache. The Infinispan Server Console uses the Infinispan Server REST API. The content can be displayed in JSON thanks to the Protobuf Encoding that converts to JSON format.
Configuring for production
At this point, Quarkus uses the Infinispan Dev Service to run an Infinispan server and configure the application. However, in production, you will run your own Infinispan (or Red Hat Data Grid).
Let’s start an Infinispan server on the port 11222 using:
docker run -it -p 11222:11222 -e USER="admin" -e PASS="password" quay.io/infinispan/server:latestThen, open the src/main/resources/application.properties file and add:
%prod.quarkus.infinispan-client.hosts=localhost:11222 (1)
%prod.quarkus.infinispan-client.username=admin (2)
%prod.quarkus.infinispan-client.password=password (3)| 1 | Sets Infinispan Server address list, separated with semicolons |
| 2 | Sets the authentication username |
| 3 | Sets the authentication password |
打包,并在JVM模式下运行
你可以将应用打包为一个传统的jar文件,然后运行。
首先,需要打包:
quarkus build./mvnw install./gradlew build| This command will start an Infinispan instance to execute the tests. |
然后运行它:
java -jar target/quarkus-app/quarkus-run.jar以本地(native)模式运行
无需对源代码做任何修改,就可以将应用程序构建为一个本地可执行文件。本地可执行文件消除了对JVM的依赖,它包含了在目标平台上运行应用程序所需的一切,使应用程序能够以最小的资源开销运行。
编译一个本地可执行文件需要很长的时间,因为GraalVM会执行额外的步骤来删除不必要的代码路径。可使用 native profile来编译一个本地可执行文件:
quarkus build --native./mvnw install -Dnative./gradlew build -Dquarkus.native.enabled=true构建完成后,可以用以下命令运行可执行文件:
./target/infinispan-client-quickstart-1.0.0-SNAPSHOT-runner进一步探索
To learn more about the Quarkus Infinispan extension, check the Infinispan Client extension reference guide.