Getting started with WebSockets Next
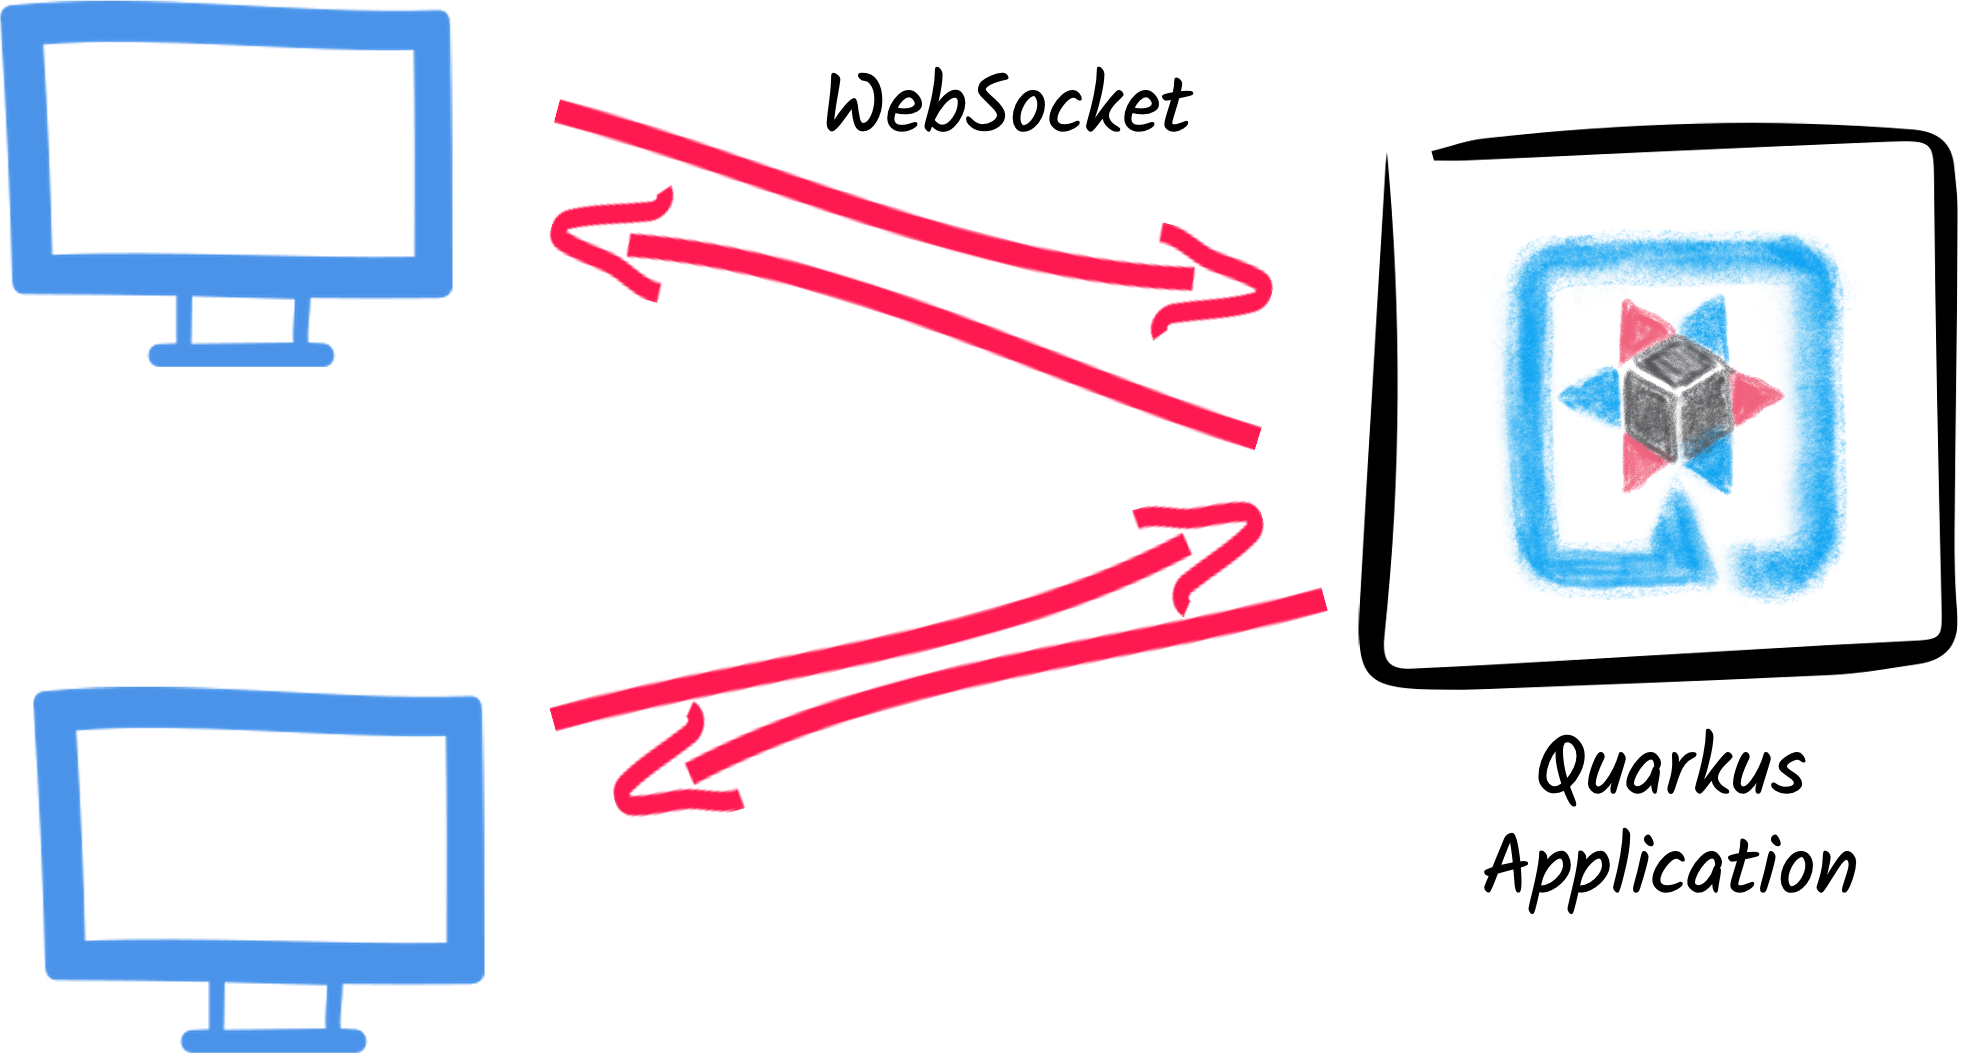
This guide explains how your Quarkus application can utilize web sockets to create interactive web applications. In this guide, we will develop a very simple chat application using web sockets to receive and send messages to the other connected users.
先决条件
完成这个指南,你需要:
-
大概15分钟
-
编辑器
-
JDK 17+ installed with
JAVA_HOMEconfigured appropriately -
Apache Maven 3.9.16
-
如果你愿意的话,还可以选择使用Quarkus CLI
-
如果你想构建原生可执行程序,可以选择安装Mandrel或者GraalVM,并正确配置(或者使用Docker在容器中进行构建)
Quarkus WebSockets vs. Quarkus WebSockets Next
This guide uses the quarkus-websockets-next extension.
This extension is a new implementation of the WebSocket API that is more efficient and easier to use than the original quarkus-websockets extension. The original quarkus-websockets extension is still available and will continue to be supported.
Unlike quarkus-websockets, quarkus-web-socket-next does NOT implement Jakarta WebSocket.
Instead, it provides a simplified and more modern API that is easier to use.
It is also designed to work efficiently with Quarkus' reactive programming model and the Quarkus' networking layer.
What you’ll learn
-
How to use the
quarkus-websockets-nextextension -
How to declare a web socket endpoint
-
How to send and receive messages using web sockets
-
How to broadcast messages to all connected users
-
How to be notified of new connections and disconnections
-
How to use path parameters in web socket URLs
应用结构
In this guide, we create a straightforward chat application using web sockets to receive and send messages to the other connected users.
解决方案
我们建议您按照下面几节的说明,一步一步地创建应用程序。不过,您可以直接跳到已完成的例子。
克隆 Git 仓库可使用命令: git clone https://github.com/quarkusio/quarkus-quickstarts.git ,或者下载 压缩包 。
The solution is located in the websockets-next-quickstart directory.
创建Maven项目
首先,我们需要一个新的项目。使用以下命令创建一个新项目:
For Windows users:
-
If using cmd, (don’t use backward slash
\and put everything on the same line) -
If using Powershell, wrap
-Dparameters in double quotes e.g."-DprojectArtifactId=websockets-next-quickstart"
This command generates the project (without any classes) and imports the websockets-next extension.
If you already have your Quarkus project configured, you can add the websockets-next extension
to your project by running the following command in your project base directory:
quarkus extension add websockets-next./mvnw quarkus:add-extension -Dextensions='websockets-next'./gradlew addExtension --extensions='websockets-next'这会在你的构建文件中添加以下内容:
<dependency>
    <groupId>io.quarkus</groupId>
    <artifactId>quarkus-websockets-next</artifactId>
</dependency>implementation("io.quarkus:quarkus-websockets-next")Declaring a WebSocket endpoint
Our application contains a single class that handles the web sockets.
Create the org.acme.websockets.ChatWebSocket class in the src/main/java directory.
Copy the following content into the created file:
package org.acme.websockets;

import io.quarkus.websockets.next.OnClose;
import io.quarkus.websockets.next.OnOpen;
import io.quarkus.websockets.next.OnTextMessage;
import io.quarkus.websockets.next.WebSocket;
import io.quarkus.websockets.next.WebSocketConnection;
import jakarta.inject.Inject;

@WebSocket(path = "/chat/{username}")  (1)
public class ChatWebSocket {

    // Declare the type of messages that can be sent and received
    public enum MessageType {USER_JOINED, USER_LEFT, CHAT_MESSAGE}
    public record ChatMessage(MessageType type, String from, String message) {
    }

    @Inject
    WebSocketConnection connection;  (2)

    @OnOpen(broadcast = true)       (3)
    public ChatMessage onOpen() {
        return new ChatMessage(MessageType.USER_JOINED, connection.pathParam("username"), null);
    }

    @OnClose                    (4)
    public void onClose() {
        ChatMessage departure = new ChatMessage(MessageType.USER_LEFT, connection.pathParam("username"), null);
        connection.broadcast().sendTextAndAwait(departure);
    }

    @OnTextMessage(broadcast = true)  (5)
    public ChatMessage onMessage(ChatMessage message) {
        return message;
    }

}| 1 | Declares the web socket endpoint and configure the path. Note that the path can contain a path parameter: username. |
| 2 | A session scoped bean that represents the connection to the client. It allows sending messages programmatically and retrieve the path parameters. |
| 3 | This method is called when a new client connects. The broadcast = true attribute indicates that the returned message should be sent to all connected clients. |
| 4 | This method is called when a client disconnects. The method uses the WebSocketConnection to broadcast a message to all remaining connected clients. |
| 5 | This method is called when a client sends a message. The broadcast = true attribute indicates that the returned message should be sent to all connected clients. Here, we just returns the received (text) message. |
As you can see, Quarkus handles the web socket lifecycle and message handling using annotations. It also serializes and deserializes messages using JSON automatically.
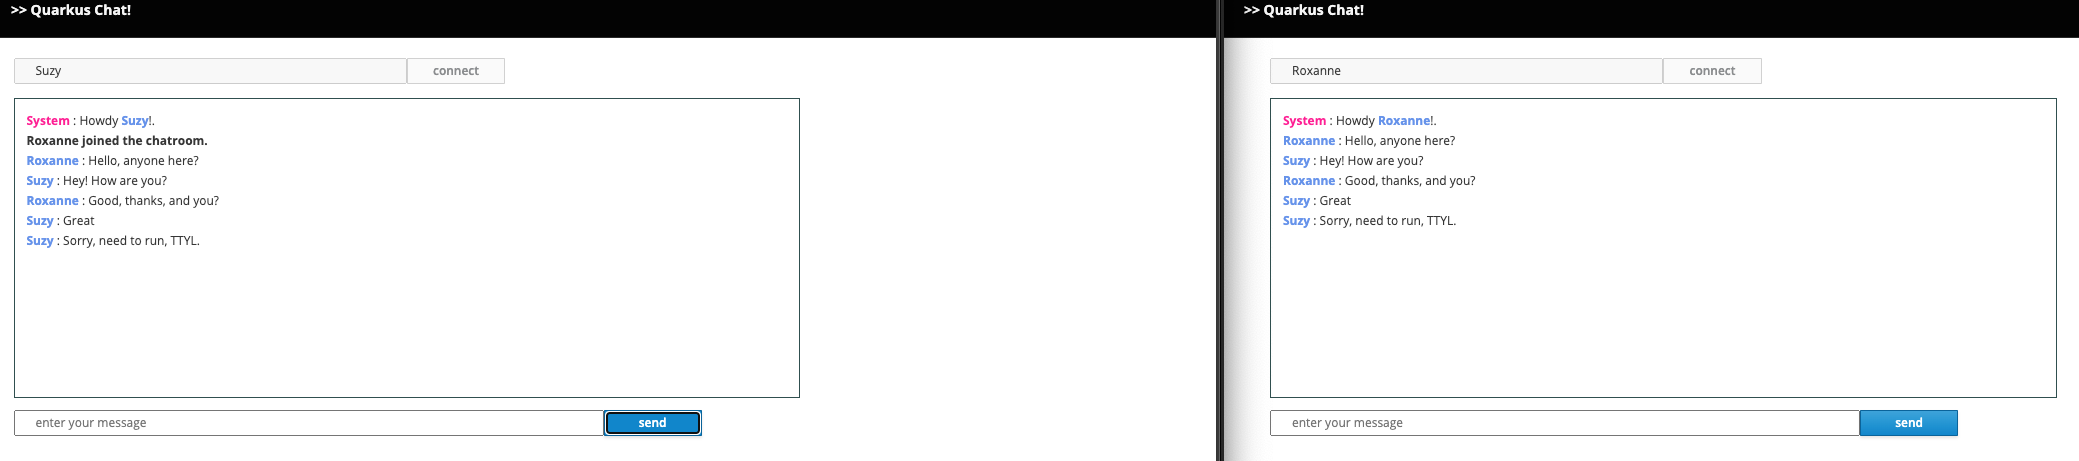
A slick web frontend
All chat applications need a nice UI, well, this one may not be that nice, but does the work.
Quarkus automatically serves static resources contained in the META-INF/resources directory.
Create the src/main/resources/META-INF/resources directory and copy this index.html file in it.
运行应用程序
Now, let’s see our application in action. Run it with:
quarkus dev./mvnw quarkus:dev./gradlew --console=plain quarkusDevThen open your 2 browser windows to http://localhost:8080/:
-
Enter a name in the top text area (use 2 different names).
-
Click on connect
-
Send and receive messages
像往常一样,该应用程序可以用以下方式打包:
quarkus build./mvnw install./gradlew build并使用 java -jar target/quarkus-app/quarkus-run.jar 命令运行该应用程序。
您也可以用以下方法构建原生(native)可执行文件:
quarkus build --native./mvnw install -Dnative./gradlew build -Dquarkus.native.enabled=true解决方案
This short getting started guide has shown you how to create a simple chat application using the quarkus-websockets-next extension.
Learn more about this extension on the dedicated reference guide.