Using WebSockets with Undertow
This guide explains how your Quarkus application can utilize web sockets to create interactive web applications, in the context of an Undertow-based Quarkus application, or if you rely on Jakarta WebSocket.
|
If you don’t use Undertow or Jakarta WebSocket, it is recommended to use the more modern WebSockets Next extensions. |
Because it’s the canonical web socket application, we are going to create a simple chat application.
先决条件
完成这个指南,你需要:
-
大概15分钟
-
编辑器
-
JDK 17+ installed with
JAVA_HOMEconfigured appropriately -
Apache Maven 3.9.16
-
如果你愿意的话,还可以选择使用Quarkus CLI
-
如果你想构建原生可执行程序,可以选择安装Mandrel或者GraalVM,并正确配置(或者使用Docker在容器中进行构建)
应用结构
In this guide, we create a straightforward chat application using web sockets to receive and send messages to the other connected users.

解决方案
我们建议您按照下面几节的说明,一步一步地创建应用程序。不过,您可以直接跳到已完成的例子。
克隆 Git 仓库: git clone https://github.com/quarkusio/quarkus-quickstarts.git ,或下载一个 存档 。
The solution is located in the websockets-quickstart directory.
创建Maven项目
首先,我们需要一个新的工程项目。用以下命令创建一个新项目:
For Windows users:
-
If using cmd, (don’t use backward slash
\and put everything on the same line) -
If using Powershell, wrap
-Dparameters in double quotes e.g."-DprojectArtifactId=websockets-quickstart"
This command generates the project (without any classes) and imports the websockets extension.
If you already have your Quarkus project configured, you can add the websockets extension
to your project by running the following command in your project base directory:
quarkus extension add websockets./mvnw quarkus:add-extension -Dextensions='websockets'./gradlew addExtension --extensions='websockets'这会将以下内容添加到你的构建文件中:
<dependency>
    <groupId>io.quarkus</groupId>
    <artifactId>quarkus-websockets</artifactId>
</dependency>implementation("io.quarkus:quarkus-websockets")
If you only want to use the WebSocket client you should include quarkus-websockets-client instead.
|
Handling web sockets
Our application contains a single class that handles the web sockets.
Create the org.acme.websockets.ChatSocket class in the src/main/java directory.
Copy the following content into the created file:
package org.acme.websockets;

import java.util.Map;
import java.util.concurrent.ConcurrentHashMap;

import jakarta.enterprise.context.ApplicationScoped;
import jakarta.websocket.OnClose;
import jakarta.websocket.OnError;
import jakarta.websocket.OnMessage;
import jakarta.websocket.OnOpen;
import jakarta.websocket.server.PathParam;
import jakarta.websocket.server.ServerEndpoint;
import jakarta.websocket.Session;

@ServerEndpoint("/chat/{username}")         (1)
@ApplicationScoped
public class ChatSocket {

    Map<String, Session> sessions = new ConcurrentHashMap<>(); (2)

    @OnOpen
    public void onOpen(Session session, @PathParam("username") String username) {
        broadcast("User " + username + " joined");
        sessions.put(username, session);
    }

    @OnClose
    public void onClose(Session session, @PathParam("username") String username) {
        sessions.remove(username);
        broadcast("User " + username + " left");
    }

    @OnError
    public void onError(Session session, @PathParam("username") String username, Throwable throwable) {
        sessions.remove(username);
        broadcast("User " + username + " left on error: " + throwable);
    }

    @OnMessage
    public void onMessage(String message, @PathParam("username") String username) {
        broadcast(">> " + username + ": " + message);
    }

    private void broadcast(String message) {
        sessions.values().forEach(s -> {
            s.getAsyncRemote().sendObject(message, result ->  {
                if (result.getException() != null) {
                    System.out.println("Unable to send message: " + result.getException());
                }
            });
        });
    }

}| 1 | Configures the web socket URL |
| 2 | Stores the currently opened web sockets |
A slick web frontend
All chat applications need a nice UI, well, this one may not be that nice, but does the work.
Quarkus automatically serves static resources contained in the META-INF/resources directory.
Create the src/main/resources/META-INF/resources directory and copy this index.html file in it.
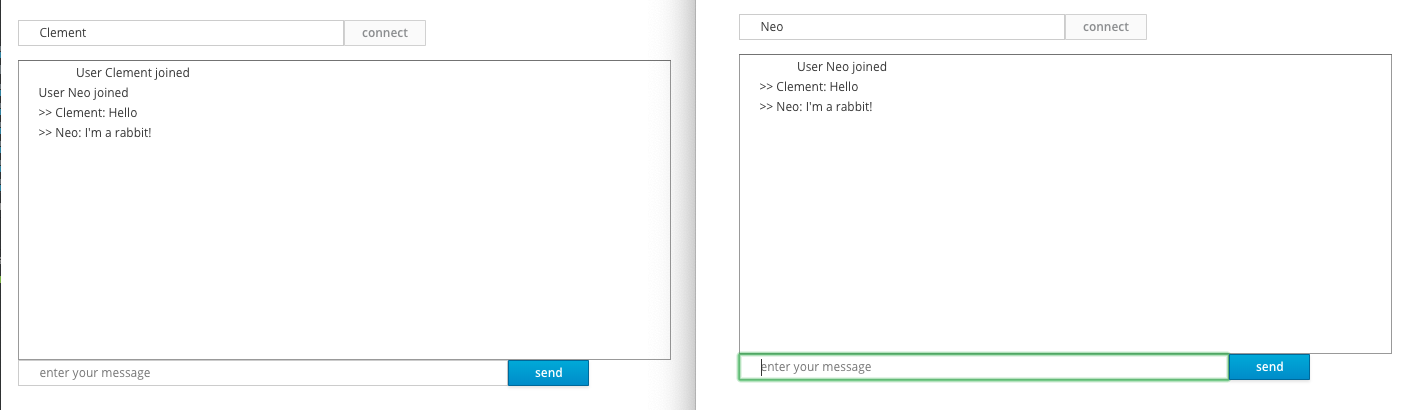
运行应用程序
Now, let’s see our application in action. Run it with:
quarkus dev./mvnw quarkus:dev./gradlew --console=plain quarkusDevThen open your 2 browser windows to http://localhost:8080/:
-
Enter a name in the top text area (use 2 different names).
-
Click on connect
-
Send and receive messages
像往常一样,该应用程序可以用以下方式打包:
quarkus build./mvnw install./gradlew build并使用 java -jar target/quarkus-app/quarkus-run.jar 命令运行该应用程序。
您也可以用以下方法构建原生(native)可执行文件:
quarkus build --native./mvnw install -Dnative./gradlew build -Dquarkus.native.enabled=trueYou can also test your web socket applications using the approach detailed here.
WebSocket Clients
Quarkus also contains a WebSocket client. You can call ContainerProvider.getWebSocketContainer().connectToServer to create a websocket connection. By default, the quarkus-websockets artifact includes both client and server support. However, if you only want the client you can include quarkus-websockets-client instead.
When you connect to the server you can either pass in the Class of the annotated client endpoint you want to use, or an instance of jakarta.websocket.Endpoint. If you
are using the annotated endpoint then you can use the exact same annotations as you can on the server, except it must be annotated with @ClientEndpoint instead of
@ServerEndpoint.
The example below shows the client being used to test the chat endpoint above.
package org.acme.websockets;

import java.net.URI;
import java.util.concurrent.LinkedBlockingDeque;
import java.util.concurrent.TimeUnit;

import jakarta.websocket.ClientEndpoint;
import jakarta.websocket.ContainerProvider;
import jakarta.websocket.OnMessage;
import jakarta.websocket.OnOpen;
import jakarta.websocket.Session;

import org.junit.jupiter.api.Assertions;
import org.junit.jupiter.api.Test;

import io.quarkus.test.common.http.TestHTTPResource;
import io.quarkus.test.junit.QuarkusTest;

@QuarkusTest
public class ChatTest {

    private static final LinkedBlockingDeque<String> MESSAGES = new LinkedBlockingDeque<>();

    @TestHTTPResource("/chat/stu")
    URI uri;

    @Test
    public void testWebsocketChat() throws Exception {
        try (Session session = ContainerProvider.getWebSocketContainer().connectToServer(Client.class, uri)) {
            Assertions.assertEquals("CONNECT", MESSAGES.poll(10, TimeUnit.SECONDS));
            Assertions.assertEquals("User stu joined", MESSAGES.poll(10, TimeUnit.SECONDS));
            session.getAsyncRemote().sendText("hello world");
            Assertions.assertEquals(">> stu: hello world", MESSAGES.poll(10, TimeUnit.SECONDS));
        }
    }

    @ClientEndpoint
    public static class Client {

        @OnOpen
        public void open(Session session) {
            MESSAGES.add("CONNECT");
            // Send a message to indicate that we are ready,
            // as the message handler may not be registered immediately after this callback.
            session.getAsyncRemote().sendText("_ready_");
        }

        @OnMessage
        void message(String msg) {
            MESSAGES.add(msg);
        }

    }

}
More WebSocket Information
The Quarkus WebSocket implementation is an implementation of Jakarta Websockets.