使用OpenID连接(OIDC)与Keycloak来做集中式授权
本指南展示了如何在您的Quarkus应用程序中使用 Keycloak授权服务 来授权不记名token(bearer token)访问受保护的资源。
The quarkus-keycloak-authorization extension is based on quarkus-oidc and provides a policy enforcer that enforces access to protected resources based on permissions managed by Keycloak and currently can only be used with the Quarkus OIDC service applications.
It provides a flexible and dynamic authorization capability based on Resource-Based Access Control.
Instead of explicitly enforcing access based on some specific access control mechanism such as Role-Based Access Control(RBAC), quarkus-keycloak-authorization checks whether a request is allowed to access a resource based on its name, identifier or URI by sending a bearer access token verified by quarkus-oidc to Keycloak Authorization Services where an authorization decision is made.
Use quarkus-keycloak-authorization only if you work with Keycloak and have Keycloak Authorization Services enabled to make authorization decisions. Use quarkus-oidc if you do not work with Keycloak or work with Keycloak but do not have its Keycloak Authorization Services enabled to make authorization decisions.
通过将授权功能从您的应用程序中抽离并外部化,您可以使用不同的访问控制机制来保护您的应用程序,也可以避免在您的安全控制需求发生变化时重新部署您的应用程序。Keycloak将作为一个集中的授权服务,它允许您的受保护资源和它们的相关权限在它这里得到管理。
关于 Bearer Token 认证机制的更多信息,请参见 使用OpenID Connect保护服务应用 指南。重要的是,是 Bearer Token 认证机制来进行认证并创建一个安全身份 - 同时 quarkus-keycloak-authorization 扩展负责根据当前的请求路径和其他策略设置对该身份来应用Keycloak授权策略。
Please see Keycloak Authorization Services documentation for more information.
先决条件
要完成这个指南,你需要:
-
大概15分钟
-
编辑器
-
安装JDK 11以上版本并正确配置了
JAVA_HOME -
Apache Maven 3.8.6
-
A working container runtime (Docker or Podman)
-
如果你愿意的话,还可以选择使用Quarkus CLI
-
如果你想构建原生可执行程序,可以选择安装Mandrel或者GraalVM,并正确配置(或者使用Docker在容器中进行构建)
应用结构
在该例子中,我们建立了一个非常简单的微服务并提供了两个节点:
-
/api/users/me -
/api/admin
这些节点是受保护的,只有当客户端将一个bearer token与请求一起发送时才能被访问,而且该token必须是有效的(例如:签名、过期时间和受众),并且要得到微服务的信任。
不记名令牌是由Keycloak服务器颁发的,并代表令牌发放对象的主体。对于OAuth 2.0授权服务器来说,该令牌还引用了代表用户的客户端。
/api/users/me 节点可由任何拥有有效token的用户访问。作为响应,它返回一个JSON文档,其中包含关于用户的详细信息,这些详细信息是从token上的信息中获得的。这个节点受到RBAC(基于角色的访问控制)的保护,只有被授予 user 角色的用户才能访问这个节点。
/api/admin 节点受到RBAC(基于角色的访问控制)的保护,只有被授予 admin 角色的用户才能访问它。
该示例非常简单,它使用RBAC策略来管理对您的资源的访问。但是,Keycloak也支持其他类型的策略,您可以用这些策略来执行更细粒度的访问控制。通过这个例子,您会发现您的应用程序与授权策略完全解耦,授权策略的执行完全基于所访问的资源。
解决方案
我们建议您按照下一节的说明逐步创建应用程序。然而,您可以直接转到已完成的示例。
克隆 Git 仓库: git clone https://github.com/quarkusio/quarkus-quickstarts.git ,或下载一个 存档 。
该方案位于 security-keycloak-authorization-quickstart 目录中。
创建项目
首先,我们需要一个新的工程项目。用以下命令创建一个新项目:
该命令生成一个项目并导入 keycloak-authorization 扩展,该扩展是一个用于Quarkus应用程序的Keycloak适配器的实现,并提供所有必要的功能来与Keycloak服务器集成并执行bearer token授权。
如果您已经配置了Quarkus项目,您可以通过在项目根目录中执行以下命令将 oidc 和 keycloak-authorization 扩展添加到您的项目中:
quarkus extension add 'oidc,keycloak-authorization'./mvnw quarkus:add-extension -Dextensions='oidc,keycloak-authorization'./gradlew addExtension --extensions='oidc,keycloak-authorization'这将在您的构建文件中添加以下内容:
<dependency>
    <groupId>io.quarkus</groupId>
    <artifactId>quarkus-oidc</artifactId>
</dependency>
<dependency>
    <groupId>io.quarkus</groupId>
    <artifactId>quarkus-keycloak-authorization</artifactId>
</dependency>implementation("io.quarkus:quarkus-oidc")
implementation("io.quarkus:quarkus-keycloak-authorization")让我们从实现 /api/users/me 端点开始。从下面的源代码可以看出,它只是一个普通的JAX-RS资源:
package org.acme.security.keycloak.authorization;

import javax.inject.Inject;
import javax.ws.rs.GET;
import javax.ws.rs.Path;

import org.jboss.resteasy.annotations.cache.NoCache;

import io.quarkus.security.identity.SecurityIdentity;

@Path("/api/users")
public class UsersResource {

    @Inject
    SecurityIdentity identity;

    @GET
    @Path("/me")
    @NoCache
    public User me() {
        return new User(identity);
    }

    public static class User {

        private final String userName;

        User(SecurityIdentity identity) {
            this.userName = identity.getPrincipal().getName();
        }

        public String getUserName() {
            return userName;
        }
    }
}
/api/admin 节点的源代码也非常简单:
package org.acme.security.keycloak.authorization;

import javax.ws.rs.GET;
import javax.ws.rs.Path;
import javax.ws.rs.Produces;
import javax.ws.rs.core.MediaType;

import io.quarkus.security.Authenticated;

@Path("/api/admin")
@Authenticated
public class AdminResource {

    @GET
    @Produces(MediaType.TEXT_PLAIN)
    public String admin() {
        return "granted";
    }
}
请注意,我们没有定义任何注解,如 @RolesAllowed ,以明确地执行对资源的访问。扩展将负责映射在Keycloak中的受保护资源的URI,并相应地评估权限,然后根据由Keycloak授予的权限来授予或拒绝访问。
配置该应用程序
OpenID Connect扩展允许您使用 application.properties 来定义适配器配置,该文件应位于 src/main/resources 目录下。
# OIDC Configuration
%prod.quarkus.oidc.auth-server-url=https://localhost:8543/realms/quarkus
quarkus.oidc.client-id=backend-service
quarkus.oidc.credentials.secret=secret
quarkus.oidc.tls.verification=none

# Enable Policy Enforcement
quarkus.keycloak.policy-enforcer.enable=true

# Tell Dev Services for Keycloak to import the realm file
# This property is not effective when running the application in JVM or Native modes
quarkus.keycloak.devservices.realm-path=quarkus-realm.json
在 quarkus.oidc.auth-server-url 上添加一个 %prod. profile前缀,可以确保 Keycloak开发服务 在应用程序以开发模式运行时为您启动一个容器。更多信息请参见下面的 " 在开发模式下运行应用程序 "部分。
|
默认情况下,使用 quarkus-oidc 扩展的应用程序被标记为 service 类型的应用程序(见 quarkus.oidc.application-type )。这个扩展也仅支持 web-app 类型的应用程序且只有当作为授权码授予响应的一部分而返回的访问token被标记为角色的来源时可行: quarkus.oidc.roles.source=accesstoken ( web-app 类型的应用程序会默认检查ID token角色)。
|
启动和配置Keycloak服务器
当您以开发模式运行应用程序时,请不要启动Keycloak服务器 - Keycloak开发服务 将启动一个容器。更多信息请参见下面在 开发模式下运行应用程序 的部分。
|
要启动Keycloak服务器,您可以使用Docker服务,且只需运行以下命令:
docker run --name keycloak -e KEYCLOAK_ADMIN=admin -e KEYCLOAK_ADMIN_PASSWORD=admin -p 8543:8443 -v "$(pwd)"/config/keycloak-keystore.jks:/etc/keycloak-keystore.jks quay.io/keycloak/keycloak:{keycloak.version} start --hostname-strict=false --https-key-store-file=/etc/keycloak-keystore.jks其中 keycloak.version 应该设置为 17.0.0 或更高。
现在您应该可以在 localhost:8543 访问您的Keycloak服务器了。
以 admin 用户身份登录,访问Keycloak管理控制台。用户名应该是 admin ,密码是 admin 。
导入https://github.com/quarkusio/quarkus-quickstarts/tree/2.16/security-keycloak-authorization-quickstart/config/quarkus-realm.json[realm配置文件]来创建一个新realm。更多细节,请参阅Keycloak文档中关于如何 创建一个新的realm 。
导入realm后,您可以看到资源的权限:
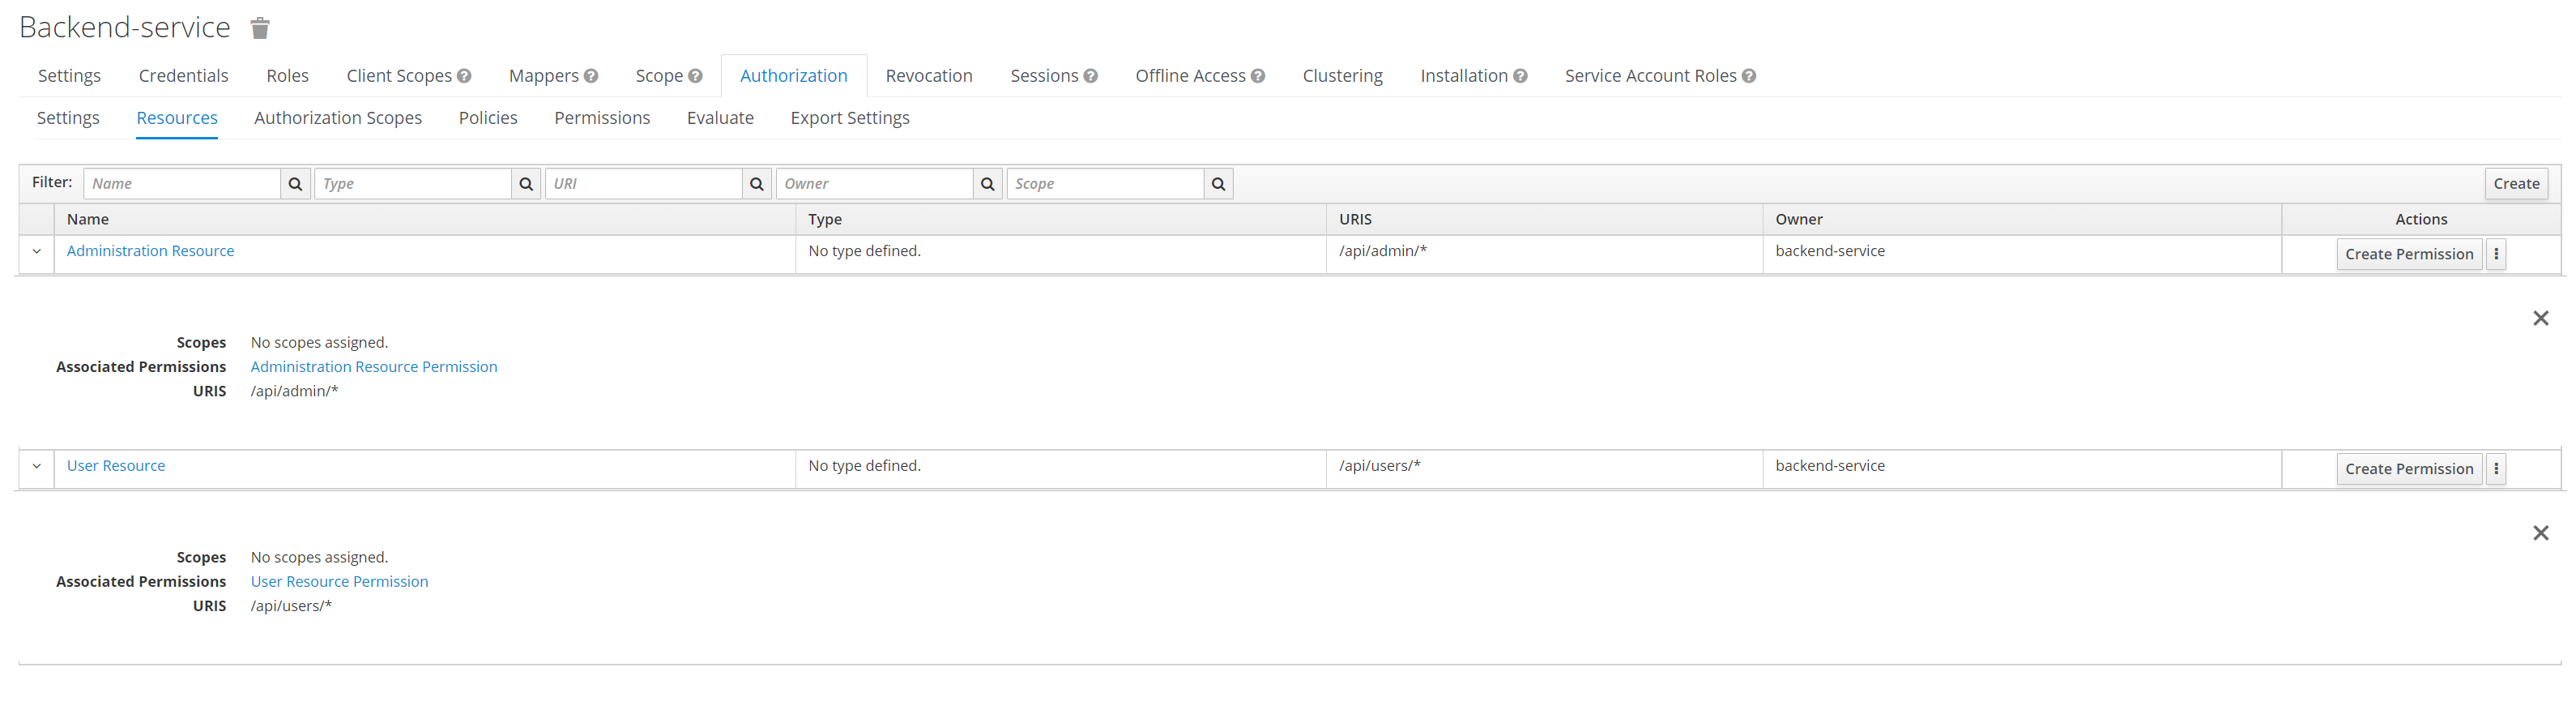
这解释了为什么节点没有 @RolesAllowed 注解—资源访问权限是直接在Keycloak中设置的。
在开发模式下运行应用程序
要在开发模式下运行应用程序,请使用:
quarkus dev./mvnw quarkus:dev./gradlew --console=plain quarkusDevKeycloak开发服务 将启动一个Keycloak容器并导入一个 quarkus-realm.json 。
您将被要求登录到由 OpenID Connect Dev UI 提供的 Single Page Application :
-
以
alice(密码:alice)登录,该用户仅有一个User Permission可以访问/api/users/me资源-
访问
/api/admin,将返回403 -
访问
/api/users/me,将返回200
-
-
退出并以
admin(密码:admin)的身份登录,他同时拥有Admin Permission以访问/api/admin资源以及User Permission以访问/api/users/me资源-
访问
/api/admin,将返回200 -
访问
/api/users/me,将返回200
-
在JVM模式下运行应用程序
当您尝试完毕 开发 模式后,您可以把它作为一个标准的Java应用程序运行。
首先编译它:
quarkus build./mvnw install./gradlew build然后运行:
java -jar target/quarkus-app/quarkus-run.jar在本地模式下运行应用程序
这个同样的演示可以被编译成本地代码:不需要任何修改。
这意味着您不再需要在您的生产环境中安装JVM,因为运行时技术包含在生产的二进制文件中,并以最小的资源开销优化运行。
编译会花一点时间,所以这一步默认是禁用的;让我们通过启用 native profile来再次构建:
quarkus build --native./mvnw install -Dnative./gradlew build -Dquarkus.package.type=native一杯咖啡的时间后,您就可以直接运行该二进制文件了:
./target/security-keycloak-authorization-quickstart-runner测试应用程序
关于在开发模式下测试您的应用程序,请参见上面 在开发模式下运行应用程序 一节。
您可以用 curl 测试在JVM或Native模式下启动的应用程序。
该应用程序使用bearer token授权,首先要做的是从Keycloak服务器获得一个访问token,以便访问应用程序资源:
export access_token=$(\
    curl --insecure -X POST https://localhost:8543/realms/quarkus/protocol/openid-connect/token \
    --user backend-service:secret \
    -H 'content-type: application/x-www-form-urlencoded' \
    -d 'username=alice&password=alice&grant_type=password' | jq --raw-output '.access_token' \
 )
上面的命令为用户 alice 获取了一个访问token。
任何用户都被允许访问 <a href="http://localhost:8080/api/users/me" class="bare">http://localhost:8080/api/users/me</a>; 节点,该节点会返回一个包含用户详细信息的JSON payload。
curl -v -X GET \
  http://localhost:8080/api/users/me \
  -H "Authorization: Bearer "$access_token
该 http://localhost:8080/api/admin 端点只能由具有 admin 角色的用户访问。如果你试图用先前发布的访问令牌访问这个端点,你应该会从服务器上得到一个 403 的响应。
 curl -v -X GET \
   http://localhost:8080/api/admin \
   -H "Authorization: Bearer "$access_token
为了访问管理节点,您需要获得一个 admin 用户的token:
export access_token=$(\
    curl --insecure -X POST https://localhost:8543/realms/quarkus/protocol/openid-connect/token \
    --user backend-service:secret \
    -H 'content-type: application/x-www-form-urlencoded' \
    -d 'username=admin&password=admin&grant_type=password' | jq --raw-output '.access_token' \
 )
以编程方式检查权限
在某些情况下,您可能想以编程方式检查一个请求是否被允许访问受保护的资源。通过在您的Bean中注入一个 SecurityIdentity 实例,您就可以按以下方式检查权限了:
import io.quarkus.security.identity.SecurityIdentity;
import io.smallrye.mutiny.Uni;

@Path("/api/protected")
public class ProtectedResource {

    @Inject
    SecurityIdentity identity;


    @GET
    public Uni<List<Permission>> get() {
        return identity.checkPermission(new AuthPermission("{resource_name}")).onItem()
                .transform(granted -> {
                    if (granted) {
                        return identity.getAttribute("permissions");
                    }
                    throw new ForbiddenException();
                });
    }
}
注入授权客户端
在某些情况下,您可能想使用 Keycloak授权客户端Java API 来执行特定的操作,如管理资源和直接从Keycloak获得权限。为此,您可以按以下方式将一个 AuthzClient 实例注入到您的bean中:
public class ProtectedResource {
    @Inject
    AuthzClient authzClient;
}
注意:如果您想直接使用 AuthzClient ,请确保设置 quarkus.keycloak.policy-enforcer.enable=true ,否则将没有Bean可供注入。
映射受保护资源
默认情况下,扩展将从Keycloak按需获取资源,而资源 URI 被用于映射您的应用程序中应被保护的资源。
如果您想禁用这种行为,并在启动期间获取资源,您可以使用以下配置:
quarkus.keycloak.policy-enforcer.lazy-load-paths=false请注意,基于您在Keycloak中的资源数量,获取这些资源的时间可能会影响您的应用程序的启动时间。
关于配置受保护资源的更多信息
在默认配置中,Keycloak负责管理角色并决定谁可以访问哪些路由。
To configure the protected routes using the @RolesAllowed annotation or the application.properties file, check the Using OpenID Connect Adapter to Protect JAX-RS Applications and Security Authorization guides. For more details, check the Security guide.
获取公共资源
If you’d like to access a public resource without quarkus-keycloak-authorization trying to apply its policies to it then you need to create a permit HTTP Policy configuration in application.properties as documented in the Security Authorization guide.
使用Keycloak授权策略禁用一个策略检查,如:
quarkus.keycloak.policy-enforcer.paths.1.path=/api/public
quarkus.keycloak.policy-enforcer.paths.1.enforcement-mode=DISABLED
is no longer required.
如果您想阻止匿名用户访问公共资源,那么您可以创建一个强制的Keycloak授权策略:
quarkus.keycloak.policy-enforcer.paths.1.path=/api/public-enforcing
quarkus.keycloak.policy-enforcer.paths.1.enforcement-mode=ENFORCING
注意只有在需要控制公共资源的匿名访问时才适用默认租户配置。
多租户
可以配置多个策略执行者的配置,每个租户一个,类似于 多租户OpenID连接服务应用程序 的配置方式。
例如:
quarkus.keycloak.policy-enforcer.enable=true

# Default Tenant
quarkus.oidc.auth-server-url=${keycloak.url}/realms/quarkus
quarkus.oidc.client-id=quarkus-app
quarkus.oidc.credentials.secret=secret

quarkus.keycloak.policy-enforcer.enforcement-mode=PERMISSIVE
quarkus.keycloak.policy-enforcer.paths.1.name=Permission Resource
quarkus.keycloak.policy-enforcer.paths.1.path=/api/permission
quarkus.keycloak.policy-enforcer.paths.1.claim-information-point.claims.static-claim=static-claim

# Service Tenant

quarkus.oidc.service-tenant.auth-server-url=${keycloak.url}/realms/quarkus
quarkus.oidc.service-tenant.client-id=quarkus-app
quarkus.oidc.service-tenant.credentials.secret=secret

quarkus.keycloak.service-tenant.policy-enforcer.enforcement-mode=PERMISSIVE
quarkus.keycloak.service-tenant.policy-enforcer.paths.1.name=Permission Resource Service
quarkus.keycloak.service-tenant.policy-enforcer.paths.1.path=/api/permission
quarkus.keycloak.service-tenant.policy-enforcer.paths.1.claim-information-point.claims.static-claim=static-claim


# WebApp Tenant

quarkus.oidc.webapp-tenant.auth-server-url=${keycloak.url}/realms/quarkus
quarkus.oidc.webapp-tenant.client-id=quarkus-app
quarkus.oidc.webapp-tenant.credentials.secret=secret
quarkus.oidc.webapp-tenant.application-type=web-app
quarkus.oidc.webapp-tenant.roles.source=accesstoken

quarkus.keycloak.webapp-tenant.policy-enforcer.enforcement-mode=PERMISSIVE
quarkus.keycloak.webapp-tenant.policy-enforcer.paths.1.name=Permission Resource WebApp
quarkus.keycloak.webapp-tenant.policy-enforcer.paths.1.path=/api/permission
quarkus.keycloak.webapp-tenant.policy-enforcer.paths.1.claim-information-point.claims.static-claim=static-claim
配置参考
以下配置基于官方文档 Keycloak Policy Enforcer Configuration。如果您想要查看不同配置选项的更多细节,请参看该文档,
Configuration property fixed at build time - All other configuration properties are overridable at runtime
类型 |
默认 |
|
|---|---|---|
Adapters will make separate HTTP invocations to the Keycloak server to turn an access code into an access token. This config option defines how many connections to the Keycloak server should be pooled Environment variable: Show more |
int |
|
Specifies how policies are enforced. Environment variable: Show more |
|
|
Defines the limit of entries that should be kept in the cache Environment variable: Show more |
int |
|
Defines the time in milliseconds when the entry should be expired Environment variable: Show more |
long |
|
Specifies how the adapter should fetch the server for resources associated with paths in your application. If true, the policy enforcer is going to fetch resources on-demand accordingly with the path being requested Environment variable: Show more |
boolean |
|
Specifies how scopes should be mapped to HTTP methods. If set to true, the policy enforcer will use the HTTP method from the current request to check whether access should be granted Environment variable: Show more |
boolean |
|
The name of a resource on the server that is to be associated with a given path Environment variable: Show more |
string |
|
A URI relative to the application’s context path that should be protected by the policy enforcer Environment variable: Show more |
string |
|
The name of the HTTP method Environment variable: Show more |
string |
required |
An array of strings with the scopes associated with the method Environment variable: Show more |
list of string |
required |
A string referencing the enforcement mode for the scopes associated with a method Environment variable: Show more |
|
|
Specifies how policies are enforced Environment variable: Show more |
|
|
Environment variable: |
|
|
Environment variable: |
|
|
Environment variable: |
|
|
Environment variable: |
|
|
类型 |
默认 |
|
Adapters will make separate HTTP invocations to the Keycloak server to turn an access code into an access token. This config option defines how many connections to the Keycloak server should be pooled Environment variable: Show more |
int |
|
Specifies how policies are enforced. Environment variable: Show more |
|
|
The name of a resource on the server that is to be associated with a given path Environment variable: Show more |
string |
|
A URI relative to the application’s context path that should be protected by the policy enforcer Environment variable: Show more |
string |
|
The name of the HTTP method Environment variable: Show more |
string |
required |
An array of strings with the scopes associated with the method Environment variable: Show more |
list of string |
required |
A string referencing the enforcement mode for the scopes associated with a method Environment variable: Show more |
|
|
Specifies how policies are enforced Environment variable: Show more |
|
|
Environment variable: |
|
|
Environment variable: |
|
|
Defines the limit of entries that should be kept in the cache Environment variable: Show more |
int |
|
Defines the time in milliseconds when the entry should be expired Environment variable: Show more |
long |
|
Specifies how the adapter should fetch the server for resources associated with paths in your application. If true, the policy enforcer is going to fetch resources on-demand accordingly with the path being requested Environment variable: Show more |
boolean |
|
Environment variable: |
|
|
Environment variable: |
|
|
Specifies how scopes should be mapped to HTTP methods. If set to true, the policy enforcer will use the HTTP method from the current request to check whether access should be granted Environment variable: Show more |
boolean |
|

