Ideas on Quarkus command-mode, UI-based apps and releasing via GitHub Actions
By

Quarkus is advertised as a cloud-native runtime for Microservices but the introduction of command-mode might have opened up new and interesting spaces where it could find adoption.
In this blog post I will present a few ideas about the possible usage of command-mode in Quarkus that you might find useful to consider when developing your next tool. If you have not heard about command-mode, I suggest to start reading this introduction first and then come back.
Ready? Ok, let’s continue.
Cross-platform builds via GitHub Actions
Command-line tools like kubectl are often written in languages like C, Go or Rust and compiled to native executables for various target platforms.
This is great because you don’t need to rely on Java installed; or being installed in a wrong version.
With GraalVM native-images, this argument against Java does not hold anymore. Quarkus supports the build of native executables via GraalVM; mainly for building natively for Linux containers but there is experimental support for OS X and Windows as well. Using the native build in combination with command-mode sounds like a very interesting and productive choice to write command-line tools.
But how do you build your native executables for Linux, Mac and Windows? If you are hosting your sources as a GitHub project, I can tell you that it is super-simple to get started. GitHub offers Actions which is a free service like Travis CI but fully integrated into the GitHub experience. Also, it offers runners (i.e. the build agents) for Linux, Mac and Windows.
To provide a native release-build for linux, place the following file under .github/workflows in your repo:
name: release-build

on:
  release:
    types: [created] (1)

jobs:
  build:

    runs-on: ubuntu-latest (2)

    steps:
    - uses: actions/checkout@v2
    - name: Install graalvm
      uses: DeLaGuardo/setup-graalvm@3
      with:
        graalvm-version: '20.0.0.java11'
    - name: Install native-image
      run: gu install native-image
    - name: Set version
      run: ./mvnw versions:set -DnewVersion="${{ github.event.release.tag_name }}" (3)
    - name: Build native executable
      run: ./mvnw package -Dnative (4)
    - name: Upload native executable
      id: upload-native-executable
      uses: actions/upload-release-asset@v1
      env:
        GITHUB_TOKEN: ${{ secrets.GITHUB_TOKEN }}
      with:
        upload_url: ${{ github.event.release.upload_url }}
        asset_path: ./target/quarkus-ls-${{ github.event.release.tag_name }}-runner (5)
        asset_name: quarkus-ls-${{ github.event.release.tag_name }}-linux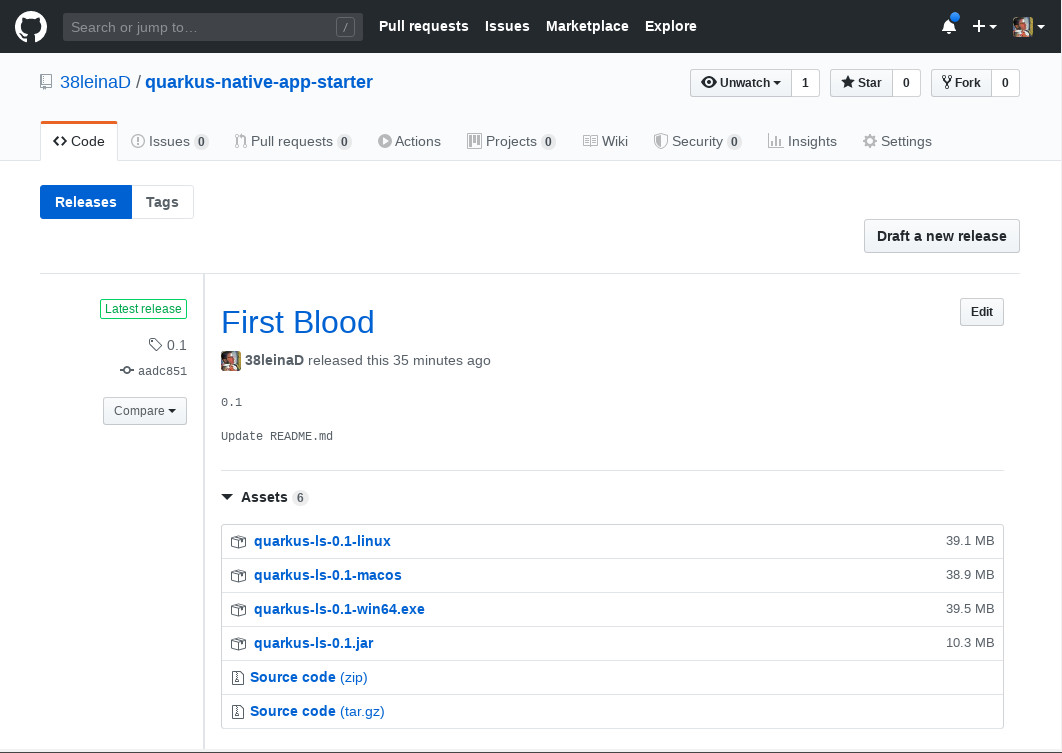
asset_content_type: application/octet-stream| 1 | This build-job is triggered when a new release is triggered. If your are the owner, you will have the button "Draft a new release" under releases |
| 2 | Uses a ubuntu runner. See GitHub Actions Virtual Environments for a list of all supported environments/runners. |
| 3 | Set version in pom.xml based on specified release version |
| 4 | Build the native executable |
| 5 | Upload/attach the artifact to the release |
Building for Mac just means to provide another job with runs-on: macos-latest.
Windows is essentially the same but requires a little more attention and knowledge about the tooling. Getting it working required some investigation on how the native build depends on Visual Studio. Also,the Windows runners on GitHub Actions have a too small page-file by default. That needs increasing as the memory consumption is rather high when running the GraalVMs native-image command.
An full example of a working native-image build under windows can be found here.
After triggering a release from the GitHub UI, the jobs for all target environments are triggered. The artifacts for all platforms are will be available within minutes and can be consumed by your users. Building, hosting: 100% free and no external service or registration needed.
Command-mode for UI-based applications
Another exciting thing about command-mode is that it not only allows to write nice command-line tools (using e.g. Picocli, Aesh or Apache Commons CLI) but in general allows to have more control over the lifecycle of an application. With the possibility to embed your HTML/Javascript frontend, we can even build Electron-style desktop application with rich user interfaces for our tools. As even JSF most likely will be coming to Quarkus, there is a great variety of choices on how to build a frontend.
A very simple scaffold does not require much. If you have quarkus-resteasy as a dependency, the embedded server will be started on port 8080 just like in any regular Quarkus backend application.
As your tools might be running on a developer system alongside other app-servers or Quarkus instances, it is a good idea to choose a different port to not run into conflicts.
Configuring quarkus.http.port=0 in your application.properties will make Quarkus choose a random but free port.
How to know from within your application which port it is? When injecting the config-property via @ConfigProperty(name = "quarkus.http.port"), you will get the assigned port.
Assuming you have your front-end under src/main/resources/META-INF/resources (in my example it is plain HTML with Javascript) and using a very old Java API (Desktop.getDesktop().browse(…)), you can spin up the default browser to your app like this:
import java.awt.Desktop;
import java.net.URI;
import org.eclipse.microprofile.config.inject.ConfigProperty;
import io.quarkus.runtime.Quarkus;
import io.quarkus.runtime.QuarkusApplication;
import io.quarkus.runtime.annotations.QuarkusMain;

@QuarkusMain
public class HelloMain implements QuarkusApplication {

    @ConfigProperty(name = "quarkus.http.port")
    Integer assignedPort; (1)

    public static void main(String[] args) {
        Quarkus.run(HelloMain.class, args);
    }

    @Override
    public int run(String... args) throws Exception {
        URI webappUri = new URI("http://localhost:" + assignedPort + "/index.html"); (2)

        Desktop.getDesktop().browse(webappUri);
        Quarkus.waitForExit(); (3)

        return 0;
    }
}| 1 | Get the assigned port |
| 2 | Open the index.html of your webapp with the default browser. |
| 3 | Do not exit immediately but wait until the browser/tab is closed. See below for options how to do this. |
There are some more considerations here to make it work reliably.
Ending the application when the browser window closes requires some feedback. There are simple ways to achieve this in a semi-reliabe way (see the usage of unload in index.html by calling a rest endpoint). For Desktop-class applications, one might have to control the browser process more closely; or, like Electron, even package an own version of Chrome.
A problem I was facing is that Desktop.getDesktop().browse(…) does not seem to work reliably when run in native mode with the GraalVM version I was using (issue). The alternative, like already stated before, is to control the browser more directly and for example open a Chrome window via Runtime.exec(…). See the main method of the starter project for some possibilities to experiment with.
Summary
It will be interesting to see where people are taking command-mode. Maybe we will be seeing Electron-style Desktop applications being developed based on Quarkus? At least to me, this sounds promising and productive. No wasting of time to learn a completely different stack just to write a small tool. Instead, use the same stack and API I am familar with from backend development anyway.
We have seen that making a tool available in a way that is easy to consume by people can be achived with GitHub and GitHub Actions alone.
In case you are interested in a more complete tool where I have used the ideas presented here, check out my bpmn-diff project which is a Git difftool for BPMN files. As an added benefit, it uses Gradle as opposed to Maven and thus provides additional examples on the use of GitHub Actions.