Getting Started with Apache Kafka in your Quarkus application

Apache Kafka is a prevalent distributed streaming platform offering a unique set of characteristics such as message retention, replay capabilities, consumer groups, and so on. Kafka is highly scalable, fault-tolerant, and is becoming the spine of many modern systems. That being said, Kafka is not the only one out there, and choosing the right messaging technology for your application can be challenging. There are many articles to help you drive your decision, such as this one. This post is about Kafka, and an equivalent post about AMQP will be published later.
In this post, you will learn how to get started with Apache Kafka in your Quarkus application in less than 10 steps. We will use Reactive Messaging - a declarative approach to build event-driven microservices, but you can also use bare Kafka APIs or Kafka Streams.
| The complete code is available from GitHub. |
Step 1 - Generate your project
Let’s start with the very beginning, getting a new project structure with the right dependencies. Go to https://code.quarkus.io, enter your group id and artifact id. Then in the extension list, select:
-
SmallRye Reactive Messaging - Kafka Connector
-
RESTEasy Jackson
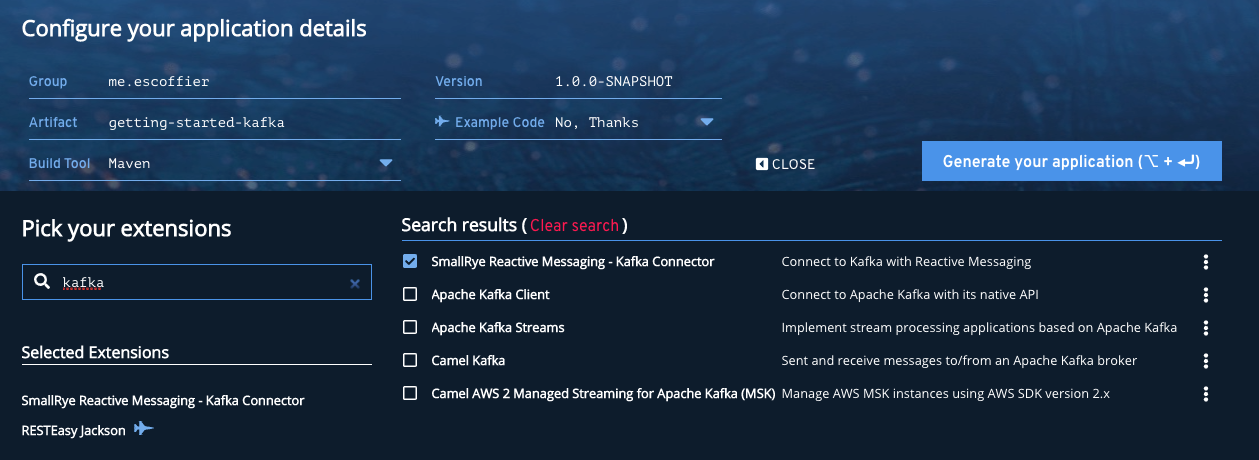
| You can disable the "Example Code" to avoid the generated project to contain examples. |
Then, click on Generate your application, download the project as a zip file, unzip it, and load it in your favorite IDE.
If you opened the generated pom.xml, you would see that the quarkus-smallrye-reactive-messaging-kafka and quarkus-resteasy-jackson
dependencies are declared, so we’re ready to write some code.
Step 2 - What are we going to exchange?
We need something to exchange.
Without much originality, let’s say we will send and receive Movie objects.
In your project, create the org.acme.Movie class with the following content:
package org.acme;

public class Movie {

    public String title;
    public int year;

}
In Kafka, we produce and consume records. A record contains a key and a value. Let’s say we will use the movie’s publication year as key and the title as value.
We also need to decide on which topic we are going to send these records. Let’s keep things simple and name our topic movies.
Step 3 - Configure the application
As said above, we will use Reactive Messaging.
When you use Reactive Messaging, you send messages to a channel and receive them from another channel.
These channels are mapped to the underlying messaging technology by configuration.
In our application, we must indicate that our reception and publication channels will use the movies Kafka channel.
In src/main/resources/application.properties, add the following content:
# The Kafka broker location (defaults to localhost:9092)
kafka.bootstrap.servers=localhost:9092

# Configuring the incoming channel (reading from Kafka)
mp.messaging.incoming.movies-in.connector=smallrye-kafka
mp.messaging.incoming.movies-in.topic=movies
mp.messaging.incoming.movies-in.key.deserializer=org.apache.kafka.common.serialization.IntegerDeserializer
mp.messaging.incoming.movies-in.value.deserializer=org.apache.kafka.common.serialization.StringDeserializer

# Configuring the outgoing channel (writing to Kafka)
mp.messaging.outgoing.movies-out.connector=smallrye-kafka
mp.messaging.outgoing.movies-out.topic=movies
mp.messaging.outgoing.movies-out.key.serializer=org.apache.kafka.common.serialization.IntegerSerializer
mp.messaging.outgoing.movies-out.value.serializer=org.apache.kafka.common.serialization.StringSerializer
After having configured the broker location with kafka.bootstrap.servers, we configure our two channels: movies-in (receiving the records) and movies-out (publishing the records).
We use the mp.messaging.incoming.movies-in prefix to configure the channel.
The connector attribute indicates who’s responsible for this channel, here the Kafka connector.
We also need to configure the key and value deserializers.
To configure the outbound movies-out channel, we use the mp.messaging.outgoing.movies-out prefix.
In addition to indicate who’s responsible for that channel, we also need to configure the key and value serializers.
Step 4 - Publishing movies to Kafka
Now, it’s time to send a record to Kafka.
Create the org.acme.MovieProducer class with the following content:
package org.acme;

import io.smallrye.reactive.messaging.kafka.Record;
import org.eclipse.microprofile.reactive.messaging.Channel;
import org.eclipse.microprofile.reactive.messaging.Emitter;

import javax.enterprise.context.ApplicationScoped;
import javax.inject.Inject;

@ApplicationScoped
public class MovieProducer {

    @Inject @Channel("movies-out")
    Emitter<Record<Integer, String>> emitter;

    public void sendMovieToKafka(Movie movie) {
        emitter.send(Record.of(movie.year, movie.title));
    }
}
In this class, we inject an Emitter, i.e., an object responsible for sending a message to a channel.
This emitter is attached to the movies-out channel (and so will send messages to Kafka).
We are sending Record objects containing the movie’s publication year as key and its title as value.
So, the rest of our application can simply use the sendMovieToKafka method to send a movie to our Kafka topic.
Step 5 - Consuming movies
Let’s now look at the other side and retrieve the movies from Kafka.
package org.acme;

import io.smallrye.reactive.messaging.kafka.Record;
import org.eclipse.microprofile.reactive.messaging.Incoming;
import org.jboss.logging.Logger;

import javax.enterprise.context.ApplicationScoped;

@ApplicationScoped
public class MovieConsumer {

    private final Logger logger = Logger.getLogger(MovieConsumer.class);

    @Incoming("movies-in")
    public void receive(Record<Integer, String> record) {
        logger.infof("Got a movie: %d - %s", record.key(), record.value());
    }
}
Here, we use the @Incoming annotation to indicate to Quarkus to call the receive method for every received record.
Step 6 - Sending movies from a REST endpoint
It’s quite common to send messages to Kafka from a REST endpoint.
To do this, create the org.acme.MovieResource class with the following content:
package org.acme;

import javax.inject.Inject;
import javax.ws.rs.Consumes;
import javax.ws.rs.POST;
import javax.ws.rs.Path;
import javax.ws.rs.Produces;
import javax.ws.rs.core.MediaType;
import javax.ws.rs.core.Response;

@Path("/")
@Consumes(MediaType.APPLICATION_JSON)
@Produces(MediaType.APPLICATION_JSON)
public class MovieResource {

    @Inject
    MovieProducer producer;

    @POST
    public Response send(Movie movie) {
        producer.sendMovieToKafka(movie);
        // Return an 202 - Accepted response.
        return Response.accepted().build();
    }
}
Step 7 - Let’s get this running!
Well, first, we need a Kafka broker.
You can follow the Apache Kafka quickstart, or use the following docker-compose.yaml file:
version: '2'

services:

  zookeeper:
    image: strimzi/kafka:0.20.1-kafka-2.6.0
    command: [
        "sh", "-c",
        "bin/zookeeper-server-start.sh config/zookeeper.properties"
    ]
    ports:
      - "2181:2181"
    environment:
      LOG_DIR: /tmp/logs

  kafka:
    image: strimzi/kafka:0.20.1-kafka-2.6.0
    command: [
        "sh", "-c",
        "bin/kafka-server-start.sh config/server.properties --override listeners=$${KAFKA_LISTENERS} --override advertised.listeners=$${KAFKA_ADVERTISED_LISTENERS} --override zookeeper.connect=$${KAFKA_ZOOKEEPER_CONNECT}"
    ]
    depends_on:
      - zookeeper
    ports:
      - "9092:9092"
    environment:
      LOG_DIR: "/tmp/logs"
      KAFKA_ADVERTISED_LISTENERS: PLAINTEXT://localhost:9092
      KAFKA_LISTENERS: PLAINTEXT://0.0.0.0:9092
      KAFKA_ZOOKEEPER_CONNECT: zookeeper:2181
Copy the docker-compose.yaml file in your project, and from a terminal, start your broker with: docker-compose up -d
Then, run the application using:
./mvnw quarkus:devThe application runs in dev mode, meaning that you can still update the code. It will reload it automatically.
In another terminal, emit a few HTTP POST request such as:
curl --header "Content-Type: application/json" \
--request POST \
--data '{"year":1994, "title":"The Shawshank Redemption"}' \
http://localhost:8080/

curl --header "Content-Type: application/json" \
--request POST \
--data '{"year":1972, "title":"The Godfather"}' \
http://localhost:8080/

curl --header "Content-Type: application/json" \
--request POST \
--data '{"year":2008, "title":"The Dark Knight"}' \
http://localhost:8080/

curl --header "Content-Type: application/json" \
--request POST \
--data '{"year":1994, "title":"Pulp Fiction"}' \
http://localhost:8080/

curl --header "Content-Type: application/json" \
--request POST \
--data '{"year":2010, "title":"Inception"}' \
http://localhost:8080/
In the terminal running the application, you will see:
...
2021-01-13 09:29:41,087 INFO  [org.acm.MovieConsumer] (vert.x-eventloop-thread-9) Got a movie: 1994 - Pulp Fiction
2021-01-13 09:29:41,114 INFO  [org.acm.MovieConsumer] (vert.x-eventloop-thread-9) Got a movie: 2010 - Inception
...
It works!
Step 8 - Native packaging
If you have GraalVM installed and configured correctly, you can package this application as a native executable:
./mvnw package -PnativeThen, execute your native executable with: ./target/getting-started-kafka-1.0.0-SNAPSHOT-runner, and you get a Quarkus application using Kafka starting in a few milliseconds and consuming a ridiculous amount of memory: less than 30Mb after 100 ingested records!
$ rss getting-started-kafka-1.0.0-SNAPSHOT-runner
PID 0M COMMAND
49321 30M ./target/getting-started-kafka-1.0.0-SNAPSHOT-runner
Summary
In less than 10 minutes, we have a new Quarkus application using Apache Kafka. If you want to go further, check the Kafka guide.