Getting Started to Quarkus Messaging with AMQP 1.0
This guide demonstrates how your Quarkus application can utilize Quarkus Messaging to interact with AMQP 1.0.
| If you want to use RabbitMQ, you should use the Quarkus Messaging RabbitMQ extension. Alternatively, if you want to use RabbitMQ with AMQP 1.0 you need to enable the AMQP 1.0 plugin in the RabbitMQ broker; check the connecting to RabbitMQ documentation. |
先决条件
完成这个指南,你需要:
-
大概15分钟
-
编辑器
-
JDK 17+ installed with
JAVA_HOMEconfigured appropriately -
Apache Maven 3.9.6
-
Docker and Docker Compose or Podman, and Docker Compose
-
如果你愿意的话,还可以选择使用Quarkus CLI
-
如果你想构建原生可执行程序,可以选择安装Mandrel或者GraalVM,并正确配置(或者使用Docker在容器中进行构建)
架构
在本指南中,我们将开发两个与AMQP代理进行通信的应用程序。我们将使用 Artemis ,但你可以使用任何AMQP 1.0代理。第一个应用程序向AMQP队列发送一个 quote request ,并消费 quote queue 中的消息。第二个应用程序接收 quote request , 并发送一个 quote back。
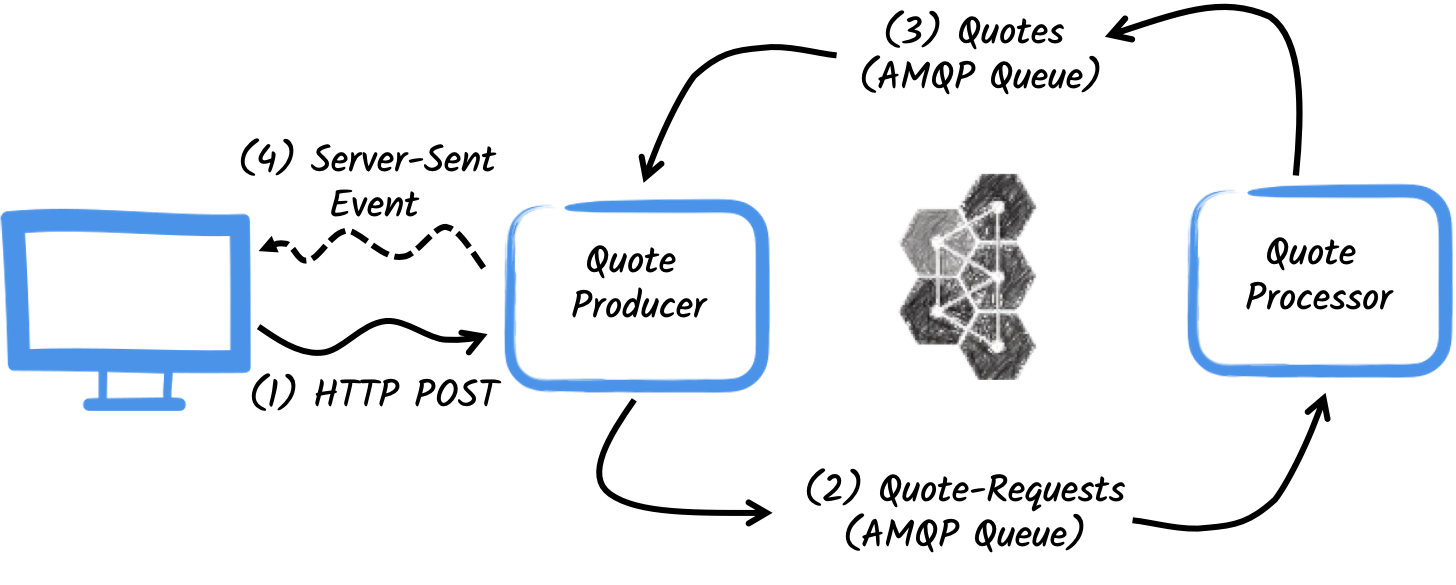
第一个应用程序 producer ,将让用户通过一个HTTP端点请求一些报价。对于每一个报价请求,都会生成一个随机标识符,并返回给用户,以便将报价请求放在 pending 上。同时,生成的请求ID通过 quote-requests 队列被发送。
反过来,第二个应用程序 processor ,将读取 quote-requests 队列,将一个随机价格放入报价,并将其发送给一个名为 quotes 的队列。
最后, producer 将读取报价,并使用服务器发送事件将其发送给浏览器。因此,用户将实时看到报价从 pending 更新为收到的价格。
解决方案
我们建议你按照下面章节中的说明,一步一步地创建应用程序。但是,你可以直接转到已完成的示例。
克隆 Git 仓库。 git clone https://github.com/quarkusio/quarkus-quickstarts.git ,或者下载一个 存档 。
The solution is located in the amqp-quickstart directory.
创建Maven项目
首先,我们需要创建两个项目: producer 和 processor 。
要创建 producer 项目,请在终端中运行:
For Windows users:
-
If using cmd, (don’t use backward slash
\and put everything on the same line) -
If using Powershell, wrap
-Dparameters in double quotes e.g."-DprojectArtifactId=amqp-quickstart-producer"
这个命令会创建项目结构,并选择我们将要使用的两个Quarkus扩展:
-
Quarkus REST (formerly RESTEasy Reactive) and its Jackson support to handle JSON payloads
-
响应式消息AMQP连接器
要创建 processor 项目,请在同一目录下运行:
For Windows users:
-
If using cmd, (don’t use backward slash
\and put everything on the same line) -
If using Powershell, wrap
-Dparameters in double quotes e.g."-DprojectArtifactId=amqp-quickstart-processor"
此时,你应该有如下的结构:
.
├── amqp-quickstart-processor
│  ├── README.md
│  ├── mvnw
│  ├── mvnw.cmd
│  ├── pom.xml
│  └── src
│     └── main
│        ├── docker
│        ├── java
│        └── resources
│           └── application.properties
└── amqp-quickstart-producer
   ├── README.md
   ├── mvnw
   ├── mvnw.cmd
   ├── pom.xml
   └── src
      └── main
         ├── docker
         ├── java
         └── resources
            └── application.properties
在你喜欢的IDE中打开这两个项目。
Quote对象
Quote 类将用在 producer 和 processor 项目中。为了简单起见,我们将重复这个类。在两个项目中,创建 src/main/java/org/acme/amqp/model/Quote.java 文件,其内容如下:
package org.acme.amqp.model;

import io.quarkus.runtime.annotations.RegisterForReflection;

@RegisterForReflection
public class Quote {

    public String id;
    public int price;

    /**
    * Default constructor required for Jackson serializer
    */
    public Quote() { }

    public Quote(String id, int price) {
        this.id = id;
        this.price = price;
    }

    @Override
    public String toString() {
        return "Quote{" +
                "id='" + id + '\'' +
                ", price=" + price +
                '}';
    }
}
Quote 对象的JSON表示将被用在发送给AMQP队列的消息中,也被用在发送给浏览器客户端的服务器发送事件中。
Quarkus有内置的功能来处理JSON AMQP消息。
|
@RegisterForReflection
|
发送报价请求
在 producer 项目中找到生成的 src/main/java/org/acme/amqp/producer/QuotesResource.java 文件,并将其内容更新为:
package org.acme.amqp.producer;

import java.util.UUID;

import jakarta.ws.rs.GET;
import jakarta.ws.rs.POST;
import jakarta.ws.rs.Path;
import jakarta.ws.rs.Produces;
import jakarta.ws.rs.core.MediaType;

import org.acme.amqp.model.Quote;
import org.eclipse.microprofile.reactive.messaging.Channel;
import org.eclipse.microprofile.reactive.messaging.Emitter;

import io.smallrye.mutiny.Multi;

@Path("/quotes")
public class QuotesResource {

    @Channel("quote-requests") Emitter<String> quoteRequestEmitter; (1)

    /**
     * Endpoint to generate a new quote request id and send it to "quote-requests" AMQP queue using the emitter.
     */
    @POST
    @Path("/request")
    @Produces(MediaType.TEXT_PLAIN)
    public String createRequest() {
        UUID uuid = UUID.randomUUID();
        quoteRequestEmitter.send(uuid.toString()); (2)
        return uuid.toString();
    }
}| 1 | 注入一个响应式消息 Emitter ,来向 quote-requests 通道发送消息。 |
| 2 | 在post请求中,生成一个随机的UUID,并使用emitter将其发送给AMQP队列。 |
quote-requests 通道将被作为一个AMQP队列来管理,因为这是classpath上唯一的连接器。如果没有另行说明,如本例中所示,Quarkus将使用通道名称作为AMQP队列名称。因此,在本例中,应用程序将消息发送给 quote-requests 队列。
| 当你有多个连接器时,你需要在应用程序配置中指出你想要使用哪个连接器。 |
处理报价请求
现在让我们来消费报价请求,并给出一个价格。在 processor 项目中,找到 src/main/java/org/acme/amqp/processor/QuoteProcessor.java 文件,并添加以下内容:
package org.acme.amqp.processor;

import java.util.Random;

import jakarta.enterprise.context.ApplicationScoped;

import org.acme.amqp.model.Quote;
import org.eclipse.microprofile.reactive.messaging.Incoming;
import org.eclipse.microprofile.reactive.messaging.Outgoing;

import io.smallrye.reactive.messaging.annotations.Blocking;

/**
 * A bean consuming data from the "request" AMQP queue and giving out a random quote.
 * The result is pushed to the "quotes" AMQP queue.
 */
@ApplicationScoped
public class QuoteProcessor {

    private Random random = new Random();

    @Incoming("requests")       (1)
    @Outgoing("quotes")         (2)
    @Blocking                   (3)
    public Quote process(String quoteRequest) throws InterruptedException {
        // simulate some hard-working task
        Thread.sleep(200);
        return new Quote(quoteRequest, random.nextInt(100));
    }
}| 1 | 表示该方法消费 requests 通道中的项 |
| 2 | 表示方法返回的对象被发送给 quotes 通道 |
| 3 | 表示该处理是 blocking ,不能在调用者线程上运行。 |
process 方法被 quote-requests 队列中的每一个AMQP消息调用,并将 Quote 对象发送给 quotes 队列。
因为我们想把 quotes-requests 队列中的消息消费到 requests 通道中,因此我们需要配置这个关联。请打开 src/main/resources/application.properties 文件并添加:
mp.messaging.incoming.requests.address=quote-requestsThe configuration properties are structured as follows:
mp.messaging.[outgoing|incoming].{channel-name}.property=value
在我们的情形中,我们想配置 address 属性来表示队列的名称。
接收报价
回到我们的 producer 项目。让我们修改 QuotesResource 来消费报价,将其绑定到一个HTTP端点,来向客户端发送事件:
import io.smallrye.mutiny.Multi;
//...

@Channel("quotes") Multi<Quote> quotes;     (1)

/**
 * Endpoint retrieving the "quotes" queue and sending the items to a server sent event.
 */
@GET
@Produces(MediaType.SERVER_SENT_EVENTS) (2)
public Multi<Quote> stream() {
    return quotes; (3)
}| 1 | 使用 @Channel 修饰符注入 quotes 通道 |
| 2 | 表示内容是使用 Server Sent Events 发送的 |
| 3 | 返回流 (Reactive Stream) 。 |
HTML页面
最后,HTML页面使用SSE读取转换后的价格。
在 producer 项目中创建 src/main/resources/META-INF/resources/quotes.html 文件,内容如下:
<!DOCTYPE html> <html lang="en"> <head> <meta charset="UTF-8"> <title>Quotes</title>
<link rel="stylesheet" type="text/css"
href="https://cdnjs.cloudflare.com/ajax/libs/patternfly/3.24.0/css/patternfly.min.css">
<link rel="stylesheet" type="text/css"
href="https://cdnjs.cloudflare.com/ajax/libs/patternfly/3.24.0/css/patternfly-additions.min.css">
</head>
<body>
<div class="container">
<div class="card">
<div class="card-body">
<h2 class="card-title">Quotes</h2>
<button class="btn btn-info" id="request-quote">Request Quote</button>
<div class="quotes"></div>
</div>
</div>
</div>
</body>
<script src="https://code.jquery.com/jquery-3.6.0.min.js"></script>
<script>
$("#request-quote").click((event) => {
fetch("/quotes/request", {method: "POST"})
.then(res => res.text())
.then(qid => {
var row = $(`<h4 class='col-md-12' id='${qid}'>Quote # <i>${qid}</i> | <strong>Pending</strong></h4>`);
$(".quotes").append(row);
});
});
var source = new EventSource("/quotes");
source.onmessage = (event) => {
var json = JSON.parse(event.data);
$(`#${json.id}`).html(function(index, html) {
return html.replace("Pending", `\$\xA0${json.price}`);
});
};
</script>
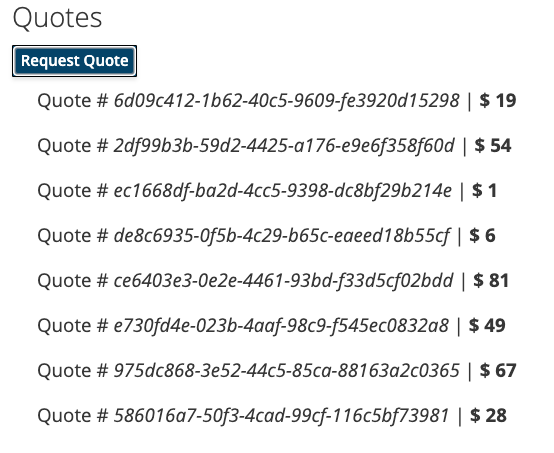
</html>这里没有什么特别之处。对于每一个收到的报价,它都会更新页面。
让其运行
你只需使用以下命令运行这两个应用程序:
> mvn -f amqp-quickstart-producer quarkus:dev并且,在另一台终端中:
> mvn -f amqp-quickstart-processor quarkus:devQuarkus会自动启动一个AMQP代理,配置应用程序,并在不同的应用程序之间共享代理实例。要了解更多的细节,请参阅 AMQP的开发服务 。
在你的浏览器中打开 http://localhost:8080/quotes.html ,点击按钮来请求一些报价。
在JVM或本地模式下运行
当不在开发或测试模式下运行时,你需要启动你的AMQP代理。你可以按照 Apache ActiveMQ Artemis网站中的说明,或者使用以下内容创建一个 docker-compose.yaml 文件:
version: '2'

services:

  artemis:
    image: quay.io/artemiscloud/activemq-artemis-broker:1.0.25
    ports:
      - "8161:8161"
      - "61616:61616"
      - "5672:5672"
    environment:
      AMQ_USER: quarkus
      AMQ_PASSWORD: quarkus
    networks:
      - amqp-quickstart-network

  producer:
    image: quarkus-quickstarts/amqp-quickstart-producer:1.0-${QUARKUS_MODE:-jvm}
    build:
      context: amqp-quickstart-producer
      dockerfile: src/main/docker/Dockerfile.${QUARKUS_MODE:-jvm}
    environment:
      AMQP_HOST: artemis
      AMQP_PORT: 5672
    ports:
      - "8080:8080"
    networks:
      - amqp-quickstart-network

  processor:
    image: quarkus-quickstarts/amqp-quickstart-processor:1.0-${QUARKUS_MODE:-jvm}
    build:
      context: amqp-quickstart-processor
      dockerfile: src/main/docker/Dockerfile.${QUARKUS_MODE:-jvm}
    environment:
      AMQP_HOST: artemis
      AMQP_PORT: 5672
    networks:
      - amqp-quickstart-network

networks:
  amqp-quickstart-network:
    name: amqp-quickstart
注意AMQP代理的位置是如何配置的。 amqp.host 和 amqp.port ( AMQP_HOST 和 AMQP_PORT 环境变量) 属性配置位置。
首先,确保你停止了应用程序,并在JVM模式下使用以下命令构建这两个应用程序:
> mvn -f amqp-quickstart-producer clean package
> mvn -f amqp-quickstart-processor clean package
一旦打包完成,请运行 docker compose up --build 。UI在 http://localhost:8080/quotes.html
要以本地方式运行你的应用程序,我们首先需要构建本地可执行文件:
> mvn -f amqp-quickstart-producer package -Dnative  -Dquarkus.native.container-build=true
> mvn -f amqp-quickstart-processor package -Dnative -Dquarkus.native.container-build=true
-Dquarkus.native.container-build=true 指示Quarkus构建可以在容器中运行的64位Linux本地可执行文件。然后,使用以下命令运行系统:
> export QUARKUS_MODE=native
> docker compose up --build
与之前一样,UI也是在 http://localhost:8080/quotes.html
更进一步
本指南展示了如何使用Quarkus与AMQP 1.0进行交互。它使用 SmallRye响应式消息来构建数据流应用程序。
如果你学过Kafka快速入门,你会意识到这是相同的代码。唯一的区别是连接器配置和JSON映射。
